Helping build an event revenue maximizing strategy
By Nathan Adams
Everyone reading this has gone to an amazing concert or pivotal game where there were empty seats. An empty arena. A non-existent crowd. Not only does this make it awkward for you when you cheer a little bit too loudly, but it can be a real drain on revenues for the venue and the company/team running the event. So how can you, as an event marketer, make sure that you are doing your best to pack that venue? One of the tools in your toolkit should be search engine marketing – most likely with Google Ads.
But anyone who has run a ticketing campaign through Google Ads knows just how difficult this process can be. Ads will constantly be turned off, accounts may be flagged and marketing budgets may never get off the ground unless you know exactly what you are doing. That’s why we’re here to help! There are three essential steps to running a campaign that sells tickets via Google Ads. Follow these steps and you should be selling out arenas in no time!
Step 1: Determine the type of ticketing operation that you are managing
Google will ask you a question at the beginning of the process that you should be prepared to answer. What business model most accurately describes your business? The options are…
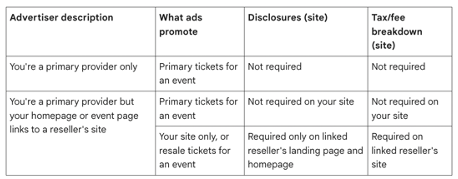
- Primary provider: The event owner, organizer, or venue that is initially selling the ticket, or a ticket seller that has been authorized to do so on their behalf, via a contractual agreement. The tickets, in either case, may not have been sold or allocated previously.
- Reseller: Businesses that resell tickets which have already been allocated or sold in the primary marketplace. A reseller or resale marketplace determines the price of the tickets (which may be above or below the face value) and any additional applicable taxes, or service charges, or fees. Requirements for resellers also apply to marketplaces that put resellers in touch with ticket buyers.
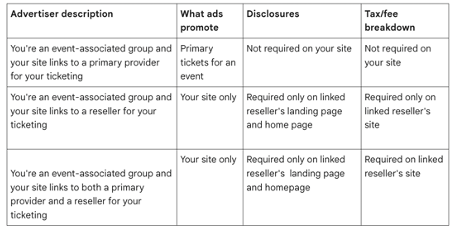
- Event-associated group: Any artist, tour, team, league, venue, and similar event or group on behalf of whom tickets are sold.
- Ticket aggregator: Any site which aggregates ticket prices from other reseller sites but does not conduct any ticket sales on their own site.
This is important because it will determine what type of information Google Ads will require on your site before you can be certified. For example…
Here is what is required for a primary provider:
And here is what is required for an event associated group:
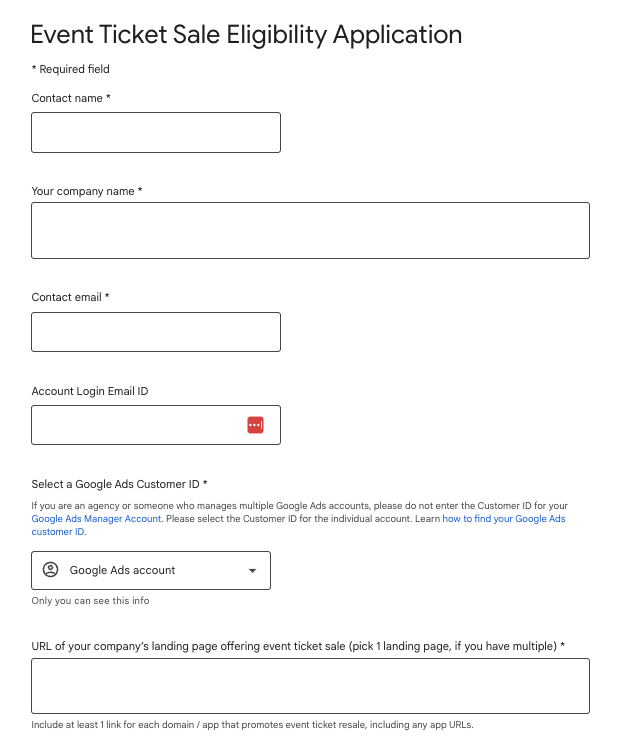
Step 2: Fill out the ticketing verification form
Google has made the process easy…as long as you follow that process to a T. The form Google will make you fill out can be found here. In addition to the basics (name, email, etc) you will need to add the following information to the form:
- Your Google Ads ID
- Your company name
- Your company URL
- Proof of domain ownership
- Any additional documents you think would be helpful
Google claims this process can take up to weeks, but we often hear back within 48 hours, typically via a phone call from a very cheery Google Ads rep who is “delighted to inform you that you have been approved to run event ticketing on Google Ads.”
Step 3: Use only the verified URL in your ads
This last step is crucial. If you run multiple events out of the same account, or if you are in the process of transitioning over ticketing websites, you will need to fill out the form for each URL that you use. ONLY use the URL that have been approved. The ticketing verification is not a blank check to run any event marketing out of a Google Ads account – only the ones they have given you the green light for.
So, there you have it! Three simple steps to get your Google Ads event ticket marketing off the ground and ready for launch.
As a final thought, beware of the If you have any questions or would like to discuss having DKC Analytics manage the digital marketing for your event, don’t hesitate to reach out to us here or send us an email at Nathan_adams@dkcnews.com.